Saturday, April 30, 2011

Peanut Butter Pie


It has been quite a tough past 2 months. The workload at university is at its peak during March, April & May and surely I've been feeling like quite a zombie. I stay at university for at least 7 hours on most of the weekdays and then come back home to continue more work. Anyone who is working and reading this is probably thinking, "You have no idea what's going to hit you after you've graduated!" I guess it's true, though.. Students do have it way better than working adults! Oh well, I do see myself missing the student life. Once we enter the "real" world it's all up hill from there.


Now that I've gotten that rant out of the way, I'll get right on with this peanut butter pie:

If there's one decadent food that I love right after chocolate, I would have to say it's peanut butter. In fact, they make such a great combination that I sometimes make a peanut butter & chocolate (usually Nutella) sandwich. Crazy, I know, but just way too good to pass up on occasion. 


Although I have to admit that my big brother is the peanut butter king at home. He loves peanut butter so much that he's tried it with everything: potato chips & fries being amongst the other foods. So when I announced that I wanted to make a peanut butter pie, he got pretty excited. He doesn't really show it, but a sister knows!


The pie turned out to be very creamy and I enjoyed it most with a glass of milk as it tends to make you thirsty after you're done eating it. Admittedly, it is quite a heavy dessert so I wouldn't recommend more than a slice a day. Make sure it's a big, chunky slice ;)
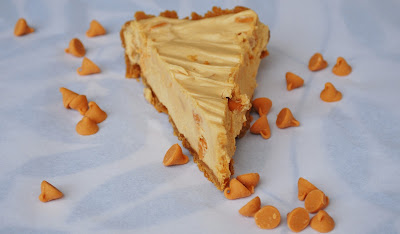


Peanut Butter Pie

For the crust

200g digestive biscuits
85g butter
2 tablespoons golden syrup*
*I used honey instead as I didn't have golden syrup at the time.

For the filling

225g full-fat soft cheese, at room temperature
150g chunky or coarse peanut butter
50g caster sugar
160ml carton of whipping cream
50g peanut butter chips

  • Preheat the oven to 180°C, gas mark 4. Make the crust: seal the biscuits in a large polythene bag and crush well with a rolling pin. (Red Panda: Or just do it the easy way and use a food processor if you have one!) In a pan, melt the butter with the syrup, then stir in the biscuit crumbs until evenly coated. Press into the bottom and up the sides of a round 23 x 5cm (9 x 2in) deep pie dish or pan. Bake for 10 minutes, then leave to cool completely.
  • Make the filling: in a bowl, beat the soft cheese, peanut butter and sugar until well blended (an electric hand-beater makes this easier). Whip the cream into very soft peaks, then fold into the peanut butter mixture. Fold in the peanut butter chips. Spoon the mixture into the biscuit case.
  • Chill, uncovered, for about an hour until firm.

Happy Baking!

Tuesday, April 19, 2011

Chocolate Roulade

I'll be honest, I'm not one for fancy words that sound French. Mainly because I don't speak French and probably never will, but also because they sort of intimidate me. It's a little silly but hey, we all have our little insecurities. This time, for a change, I decided to face my fears and show that fancy word 'roulade' who's boss!


I found this recipe in a cook book called Sweet Treats that my brother got me for my last birthday. Next to the recipe was a series of pictures depicting a woman spreading tempered chocolate on a flat marble surface and then, when the chocolate has hardened, proceeding to make tree-bark-like chocolate swirls with the edge of her knife. I was intrigued and thought that I should give it a shot.

I didn't really temper the chocolate but I found that by flattening the chocolate on a flat marble surface, allowing it to sit for 20 minutes in room temperature and then putting it in the fridge for about 15 minutes; I could handle the chocolate fairly well and create swirls out of it. You could skip this entire step and buy ready tempered chocolate, of course ;) Just hold a sharp knife at a 45° angle (or however you like, really. There's no need to get too technical!) and shave along the surface of the chocolate. It's a lot of fun and you'll get the hang of it once you've tried it a few times. Allow the curls to rest on parchment paper so that they have the chance to set.

I'll never get sick of how gorgeous melted chocolate looks


Now the hard part: rolling up the cake. I've never made any type of cake like this before in terms of technique. It was my first try, which I would say was pretty unsuccessful. I couldn't roll up the cake properly without having it break. It ended up looking quite messy and sort of like very long rectangles stacked on top of each other. I wasn't too disappointed though, the cake did turn out tasting great! There's a first time for everything, huh? ;)


The filling of the cake was my favorite part. I sort of adapted it from another recipe I found since I didn't want to make your usual buttercream for this cake. It's perfect for people who are not die-hard chocolate fans; the chocolate in it is subtle and balanced nicely with the vanilla extract.


So, maybe it was a little bit of intimidation from the Frenchiness (yeah, I just made up a word) that got me to mess this cake up a little bit. But my trusty tasters at home were pleased with the end result and I guess that's all that matters anyway!

Try this recipe out for yourself. It doesn't contain any flour so it's quite light in texture and feels more like a mousse than a cake. And even if you don't get that perfect swirly, rolled up, log shaped cake, you're still going to love the crumbly cake partnered with the creamy chocolate filling that truly melts in your mouth.


For the cake:

Butter, for greasing
225g plain chocolate
2 eggs, seperated
100g caster sugar, plus a little extra for sprinkling
  • Preheat the oven to 180°C. Line a 23x33cm (9x13in) Swiss roll tin with greased greaseproof paper. Break up 50g of the chocolate in a bowl and set over a pan of hot, not boiling, water. Stir until melted.
  • Pour melted chocolate in a thin layer on a marble slab or cold upturned baking tray and leave to set. Holding a sharp knife at an angle of about 45 degrees, shave off the surface of the chocolate to form curls. Place on greaseproof paper to set.
  • Melt the remaining chocolate as above. Whisk the egg yolks with the caster sugar for 5 minutes until pale and thick, then stir in the chocolate. Whisk the egg whites until stiff and fold into the mixture. Spread out in the prepared Swiss roll tin ad bake for 15-20 minutes until risen and firm.
  • Sprinkle a piece of greaseproof paper with caster sugar. When the roulade is cooked, turn it out on to the paper and carefully peel off the lining paper. Cover the roulade with a warm, damp tea towel and leave to cool.
  • Make the filling.
  • Spread the filling over the roulade to within 1cm of the edges. From one short end, roll it up, using the paper to help. Swirl cream on top of the cake and scatter chocolate curls on top.
For the filling:

300ml whipping cream (or double cream if you desire)
150g plain chocolate (or however much chocolate you like!)
1 tablespoon vanilla extract
  • Whip the cream until it forms soft peaks.
  • Melt the chocolate over a double boiler and allow it to cool down to room temperature.
  • Add the melted chocolate and vanilla extract to the cream and whip until well combined (should hold well but not too stiff)

Happy Baking!

Thursday, April 7, 2011

Orange Mascarpone Cake

 
Ever follow one of those recipes all the way through and then feel like changing it up a bit last-minute? Like when the recipe calls for a round pan that's 22cm but you decide, "Hey! Why not change it up a bit and go for a 20cm square pan instead? Those few cm won't make THAT much of a difference!" And once you happily implement that brilliant plan of yours, you find out that the cake didn't rise enough and you're stuck with one lonely, not-so-high layer of cake? Yeah, that. 


If there's one thing that I love about baking, it's that I am constantly on a learning curve. No matter how many years I've been involved with the art of trying to get a cake baked just right, there's always something new that I might just pick up along the way. There's always going to be mistakes made, whether you're having an off day or just don't seem to be getting it right. Eventually, with baking, one must learn to be patient and that it's all about trial and error. I won't ramble anymore about that, let's get back to this cake.


"Not to worry!" I optimistically thought to myself. So, I decided to wing it and try out my best shot at fixing this problem without making it too obvious. The simple idea of cutting the cake in half and stacking it on top of each other turned out to be quite a strategic plan. Rather than the 3-layered cake that I had initially hoped for, I ended up with a 2-layered, almost rectangular shaped cake. It seems silly, but it was a teeny proud moment of mine to be able to salvage something without adding anything fancy to it.  


The best part? No one even noticed.


For the cake:

185g butter, softened
1 tablespoon finely grated orange rind
1 cup (220g) caster sugar
3 eggs
1 cup (150g) self-raising flour
⅓ cup (40g) almond meal
½ cup (125ml) orange juice
350g raspberries
1 tablespoon orange-flavored liqueur*
  • Preheat oven to 160°C. Grease deep 22cm-round cake pan; line base and side with baking paper.
  • Beat butter, rind and caster sugar in medium bowl with electric mixer until light and fluffy. Beat in eggs, one at a time. Stir in sifted flour, almond meal and juice, in two batches. Pour mixture into pan.
  • Bake cake about 50 minutes. Stand cake in pan for 5 minutes; turn, top-side up, onto wire rack to cool.
  • Meanwhile, make mascarpone cream.
  • Reserve 12 raspberries. Split cake into three layers. Place on layer of cake on serving plate; spread with half of the mascarpone cream, then top with half of the raspberries. Repeat layering process, finishing with layer of cake. Cover; refrigerate 1 hour.
  • Serve cake with reserved raspberries and sifted icing sugar, if desired.
For the mascarpone cream

1 cup (250g) mascarpone cheese
⅓ cup (55g) icing sugar
1 teaspoon finely grated orange rind
1 tablespoon orange-flavored liqueur*
⅔ cup (160ml) thickened cream**

  • Combine mascarpone, sifted icing sugar, rind and liqueur in medium bowl. 
  • Beat cream until soft peaks form; fold into mascarpone mixture.

*I used natural orange extract instead
**I used whipping cream instead

    Happy Baking!