Showing posts with label Chocolate. Show all posts

Tuesday, September 4, 2012

Totally Chocolate Chocolate Chip Cookies

Sometimes we all need a pick-me-up. For some it's a massage or a new pair of shoes or maybe even a long phone call with a friend - don't you just love those? However for me, it's food and it's usually the sweet kind. This time it comes in the form of a chocolate chocolate chip cookie (that's quite a mouthful!)


It's been a rough summer to say the least. Not a lot has gone according to plan and there's been quite a few bumps along the way that my family and I are still dealing with. And there's also the difficulty of being a fresh graduate and looking for my first official job; the job hunt is a lot harder than I anticipated. But I am hopeful and patient, I believe something good will be coming our way very soon.


In the meantime, I try to cook and bake for everyone at home to keep spirits as high as they can possibly be. I always believed that good food was not just fuel for the body but also for the soul. And if you can bring a smile to someone's face by just putting together a few ingredients as well as your love then, why the heck not?

The name of these cookies is what first attracted me; the way Nigella Lawson described them as, "Being chocolatey to the point of madness" just meant I had to try making them myself. While you make the mix for the cookies, you know that it's going to be a chocolate explosion because the batter leaves glorious marks of chocolate on your fingers that you, of course, lick off. I'm quite shameless about that, might I add. Once these chocolate monsters are baked and cooled, you get a nice crunchy shell (if I may call it that) that you bite into to reach a lovely soft center with pops of more chocolate from the chocolate chips. This cookie's fit for any chocolate fiend lover.
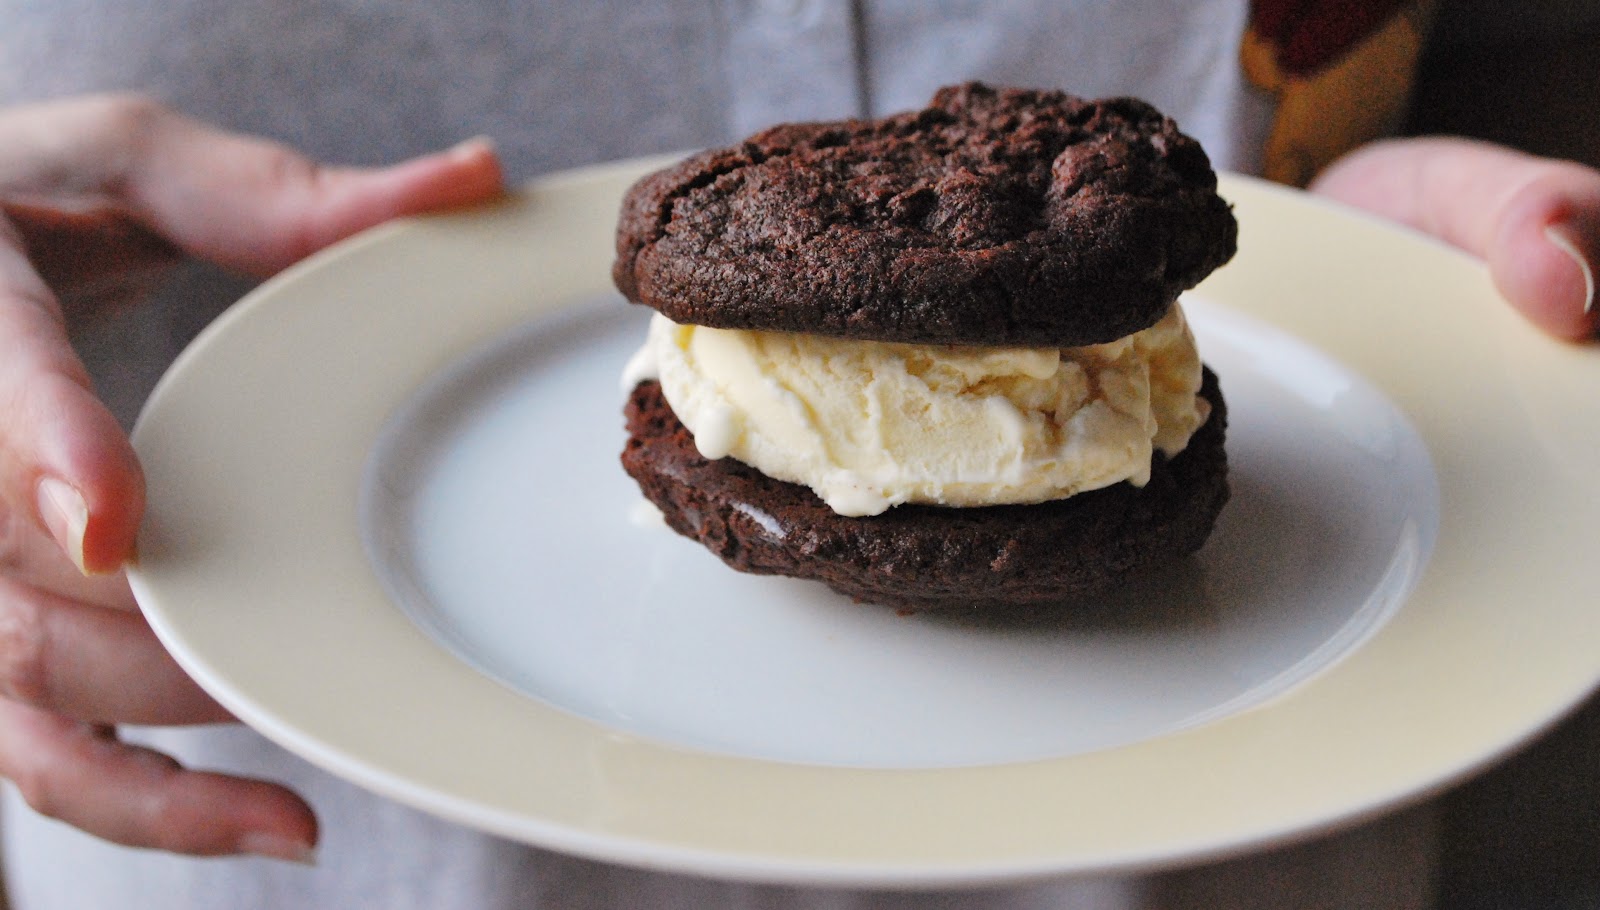
Behold, the ice cream sandwich from Heaven


And if you wanna have a bit more fun with these cookies, why not make an ice cream sandwich? It'll melt as fast as you do in this heat though, so gobble up!


Totally Chocolate Chocolate Chip Cookies from Nigella Lawson's Nigella Express
makes 12-16 depending on size

125g dark chocolate
150g flour
30g cocoa, sieved
1 teaspoon bicarbonate of soda
½ teaspoon salt
125g butter, softened
75g light brown sugar
50g white sugar
1 teaspoon vanilla extract
1 egg, cold from the fridge
350g semi-sweet chocolate morsels or dark chocolate chips

  • Preheat oven to 170°C. Melt the 125g of dark chocolate either in the microwave or in a heatproof dish over a pan of simmering water.
  • Sift the flour, cocoa, bicarbonate of soda and salt into a bowl.
  • Cream the butter and sugars in another bowl. (You can do this with a freestanding mixer or a hand-held mixer). Add the melted chocolate and mix together.
  • Beat in the vanilla extract and cold egg, and then mix in the dry ingredients. Finally stir in the chocolate morsels or chips.
  • Scoop out equal-sized mounds - an ice cream scoop and a palette knife are the best tools for the job - and place on a lined baking sheet about 6cm apart. Do not flatten them.
  • Bake for 18 minutes, testing with a cake tester to make sure it comes out semi-clean and not wet with cookie batter. If you pierce a chocolate chip, try again.
  • Leave to cool slightly on the baking sheet for 4-5 minutes, then transfer them to a cooling rack to harden as they cool.
  • Enjoy!
To make the ice cream sandwich:

  • Thaw out your favorite ice cream. I like plain, gorgeous vanilla with these cookies.
  • Scoop out a generous amount of thawed out ice cream onto your first cookie.
  • Place your other cookie on top of the ice cream and gently squeeze both cookies together.
  • Prepare yourself for a delicious mess!


Happy Baking!

Monday, August 13, 2012

Mini Vanilla & Chocolate Tarts


I've realized not too long ago that I'm pretty much obsessed with all desserts that are made in individual servings. And I simply love anything that's a miniature version of its original form. I convince myself that I'm not consuming as many calories when I have a mini cupcake, a mini apple pie, or brownies cut into tiny pieces it would be criminal to have just one. Everything's cuter when it's mini anyway. Like kittens, puppies and humans; I wouldn't advise those to be consumed though...


This brings me to a treat I like to make which is not necessarily tiny but is meant for single servings: tarts! I first started making these tarts in 2009 when I decided I wanted to try making tart crust/dough from scracth, on my own. Since then, I've learned to follow instructions better and I am now able to make crust which is light and flaky. A personal achievement! Really, anyone can make tart crust/dough, it just needs a little bit of patience and some gentle + cold hands (or a food processor if you don't like to make it by hand).


I would say that this is a fairly easy recipe to follow but is time-consuming especially if you are a beginner at making pastries. However, the results always turn out great - even if your tart crust doesn't turn out as flaky as you'd like, it will still always taste good. Practice makes perfect and I myself am still practicing to perfect this technique. After all, we're just baking to put a smile on someone's face and satisfy that sweet tooth! These tarts are great for parties or gatherings; I've baked them for a picnic and several gatherings in the past and they've always been quite a hit. I made these particular ones for my friend Wajiha who kindly invited me to her place for iftar where her mom cooked up a [delicious] storm.


I had a lot of fun decorating the chocolate tarts. Melted some chocolate and piped out flower shapes then topped them off with edible glitter.


There are so many ways to decorate tarts. I've topped the vanilla ones with berries, kiwis, and pineapples, the possibilities are endless. For the chocolate tarts, if I need something quick to top them off with, I chop chocolate and sprinkle it on top or you could even use sprinkles of your own choice. Again, it's totally up to you and what you come up with! :)

Tarts adapted from Fatafeat Magazine's Houriyat Al Matbakh
makes 25-30 tarts

Tools you'll need:

Pastry cutter (optional)
2 or 3 cupcake/muffin tins (This varies with everyone, depending on how much dough you end up with and how thick/thin you roll it out)
Cupcake/muffin liners or papers
Rolling pin
Round cookie cutter, about 3 inches in diameter
Dry beans or dry lentils or pie weights. These will be used for blind baking.

For the crust:

200g all-purpose flour
a pinch of salt
1/4 teaspoon baking powder

125g unsalted butter, fridge cold
120g sugar
1 large egg
1 teaspoon vanilla extract

butter spray or softened butter
  • In a large bowl, sift the flour, baking powder and salt
  • Cut the butter into small cubes and throw them into the flour mix. Using a pastry cutter, begin cutting the cubes of butter into the flour. Alternatively, you can use your hands: rub the mix between your hands so as to combine the butter and the flour. Keep doing this until your mixture looks like damp sand; little crumbles of dough. Whatever you do, do not knead. This will help you achieve that lovely light, flaky crust in the end.
  • In another bowl, beat the sugar, eggs and vanilla until it turns from a dark yellow into a pale yellow color and is fluffy.
  • Add the egg mix into the flour mix and fold it in. Again, do not knead the dough. Simply combine the wet and dry ingredients together; you can use your hands or a spatula, whatever you prefer.
  • If your dough still feels sticky, add more flour as you go. Continue doing this until your dough can hold its own and is formed into a ball.
  • Take a piece of cling foil and wrap your dough in it. Leave it to rest for 30 minutes in the fridge.
Assembling + Blind Baking:
  • Prepare 2-3 cupcake/muffin tins; spray a little bit of butter spray in each cup or if you're using softened butter, brush a thin layer of butter into each cup. Set aside.
  • Preheat your oven to 180°C
  • Take out the dough from the fridge, unwrap from cling foil. To make it easier for you to use, cut the ball of dough in half.
  • On a clean, flat surface which is lightly floured, roll out your dough with your rolling pin. Thickness of the dough is totally up to you, I prefer a crust that has a bit of a bite to it so I roll it out about 1/4 inch thick.
  • Using your round cookie cutter, cut out rounds; try using up as much dough as possible.
  • Take your round pieces of dough and fit each one in a separate cup in your cupcake/muffin tin. Use your fingers to push them into place and shape them as you wish. Don't worry if you mistakenly pierce little holes, just take a little piece of left-over dough and patch them up. Repeat this process till all your dough is done.
  • On top of the dough, place the cupcake/muffin papers or liners. Lightly push them into the dough. Now pour in your dry beans/lentils/pie weights and fill the papers about 2/3 to ensure they weigh down the dough.
  • Bake in the oven for 15 minutes or until you can see the edges of your dough turn a nice golden color.
  • Take out the cupcake/muffin tins from the oven. Carry out the cupcake/muffin papers or liners filled with the dry beans/lentils/pie weights. I don't throw away my dry beans as I can use them again for the next time I bake a pie or tart.
  • Switch off your oven's bottom burner and light up the top burner. Put the cupcake/muffin tins back in the oven and bake for just 5 minutes. Be careful not to burn your tart shells, this is just to lightly bake the tops which weren't previously exposed to heat.
  • Remove your baked tart shells from their tins and allow them to cool on a rack while you make the filling.
For the filling:

700ml milk, at room temperature
120 g sugar
2 eggs, at room temperature
1 teaspoon vanilla extract
60g corn flour
100g dark chocolate, broken into small pieces or chocolate chips*
  • In a large saucepan on medium heat, heat the milk till it simmers. Set aside for a bit.
  • In a bowl, beat the eggs with the sugar and vanilla until it is a pale yellow and becomes fluffy. Then add the corn flour and slowly beat that into the egg mix.
  • Spoon in about 3 spoonfuls of the heated milk into the egg mix and mix together.
  • Now add the egg mix to the rest of the milk in the sauce pan and return to medium heat.
  • Constantly stir the mix, do not leave it unattended as it can curdle.
  • Keep doing this until your filling reaches a thick consistency; it should have an egg custard-like texture.
  • Remove from heat and transfer to a bowl to cool down. *[For chocolate tarts, I separate half the ready filling into another bowl and while it is still hot, I add the chopped chocolate which melts with ease. And viola, you have chocolate filling!] 
  • Once it is at room temperature, you can either spoon the filling into your tart shells or put it in a pastry bag and pipe it with a star tip.
  • Top off vanilla tarts with fruits of your choice and the chocolate tarts with sprinkles or little pieces of chocolate, or whatever you prefer. Place them in an air-tight container and pop in the fridge to cool.
  • Enjoy!

Happy Baking!

Tuesday, July 10, 2012

Churros with Chocolate Dipping Sauce

Ever get those days when you're too lazy to roll out of bed? And so you just stay in there for the next hour either reading a book or contemplating the meaning of life and your purpose in it? And then suddenly you get that sweet tooth calling out to you, pleading that you satisfy it with a nectarous breakfast? Yeah, I get those mornings more often than I'd like to admit. Sometimes I feel a tad more creative and flip through my cook books to find something different, but easy, to make.

This is where the churros come in...


The first time I ever tried churros was when I had my first Taste of Dubai experience. I fell in love with what I'd like to call a Spanish doughnut; they had a crispy shell and were so light and airy inside. Little did I know, they are really simple to make! Apart from the chocolate dipping sauce that comes along with this recipe, the churros themselves have 7 ingredients that you need. And the best part is that all these ingredients can be found in any kitchen where lots of cooking is being done. Yay for convenience! And another yay for laziness!

The sound of the light crackling & popping of the oil when deep frying the churros is like music to my ears. (I promise I don't deep fry as much as the previous statement makes me sound like I do..) It reminds me so much of my childhood: when my mom used to make chicken nuggets and french fries for me and my brother on a lazy day in. Deep-frying seems to be synonymous with being a couch potato, huh? Ah well, everyone deserves a break from time to time. But yes, the churros. Once they touch the hot oil, they almost immediately poof up into little pillows and float on the surface. Just be careful not to burn yourself with oil popping everywhere and you're set.


The perfect lazy sweet snack for the ultimate lazy day in.

P.S. Am I a glutton for thinking these would be absolutely delicious with dulce de leche? WOW! Need to make some more to try that out.


Churros with Chocolate Dipping Sauce adapted from Nigella Lawson's Kitchen

For the churros:

50g caster sugar
2 teaspoons ground cinnamon
125g plain flour
1 teaspoon baking powder
1x15ml tablespoon olive oil
250ml freshly boiled water
approx. 500ml corn or vegetable oil, for deep frying

- Mix the sugar and cinnamon in a wide, shallow dish: this is for shaking the cooked churros in to coat them later.
- Sift the flour and baking powder into a bowl then beat in the olive oil and the boiled water.
- Keep mixing until you have a warm, sticky dough.
- Leave it to rest for about 10 minutes.
- Heat up the oil in a small saucepan, the oil should come up about a third of the way up the sides of the pan. It should be about 170°C. 
- Load up a piping bag with a large star-shaped tip and fill it with the churros dough.
- Squeeze short lengths (4-5cm) of dough into the hot oil, snipping them off with a pair of scissors as you go.
- Cook about 4-5 at a time and, once they turn a rich golden brown, fish them out of the oil with a slotted spoon or spatula or with tongs onto a baking sheet lined with some kitchen roll.
- To keep the cooked churros warm while you fry the remaining dough, transfer them to a parchment-lined baking sheet and hold in a low heat oven.
- Once you're done cooking all the churros, allow them to rest for a few minutes.
- While they're still warm, toss them in the sugar and cinnamon mixture and shake them about till they all get a good covering.

For the chocolate dipping sauce:

100g good-quality dark chocolate
25g chocolate milk
1x15ml tablespoon golden syrup
150ml double cream

- Melt all the ingredients in a heavy-based saucepan over low heat.Once the chocolate starts to melt, stir everything together and take it off the heat.
- Leave it in a warm place.
- Serve in individual pots/bowls.
- Enjoy!

Happy Baking!

Thursday, February 2, 2012

Chocolate Swirl Cheesecake

Simple words typed out on a blank screen and beautifully colored with rich vocabulary won't be able to describe how much I've missed blogging.

I fractured my arm in November and had to deal with the incompetence of some doctors which winded me up in two different casts for 6 slow weeks. Boy, that was a tough one. I wouldn't say I'm an impatient person but having to wrap my cast in a plastic bag before every shower I took was not my cup of tea. I had to quit basketball, badminton and the gym and worst of all: I had no interest in baking because that would just take much longer than usual while using one arm.


Some of the stuff friends drew on my cast :)

But of course, I tried my best to stick to the positive side of everything. I went on a university trip to Istanbul (yay, I love Turkey!). I thought my fracture would stop me from having a good time but it didn't; other than taking forever to get a sleeve through my arm, it was one of my most memorable trips where I made lots of new friends and strengthened bonds with some old friends. Later that November, I took part in the 3rd BakeFest DXB where I challenged myself to bake up batches of 3 different menu items to sell. With the help of my wonderful mother, I managed to bake an impressive amount of goodies. I even got lots of help at BakeFest and made a humble profit (much love goes out to Hana Younes, Wajiha Said and Devina Divecha for everything they kindly did for me that day. You girls were amazing!). I guess the most thing that kept me preoccupied was university. I'm on my final year now so my courses are a lot more demanding than before. Projects started piling up and exams were right around the corner with every passing week. Thankfully all that hard work and dedication paid off at the end; I was very happy with my grades! Unfortunately, it meant I had to neglect Red Panda Bakes a lot, I guess you can't have it all.


I've been baking a lot of cake lately. Partially because I've been feeling lazy after long days at university and also because, well, I love cake. But I've been getting a lot of demands from my family at home [read: from my mother] to bake a cheesecake. But I wanted to try something new. So I decided I just had to give the chocolate swirl cheesecake a go. I've been thinking about making it for the longest time and never got around to trying it out. So here it is in all its glory!


The thing I love the most about cheesecake is that making the crust makes me feel like I'm playing in the sand at the beach. The crushed biscuits stick to your fingers almost the same way damp sand does.


Making the cheesecake filling is part therapeutic and part gluttony. The therapeutic part comes from the beauty of watching all the creamy ingredients come together and smelling the burst of lemon zest once it's added. The glutton is... Me. I love licking what's left over from the filling off the spatula and the inside of the bowl. So if I share that with you then take that as a sign of true love. It's pretty serious.


I can safely say this was just as easy as making a plain cheesecake. Completely fuss free! I made these in mini cheesecake pans but you can definitely make this in a normal spring-form pan too!


Chocolate Swirl Cheesecake adapted from Tyler Florence's Ultimate Cheesecake

What You'll Need:

Crust:
2 cups (200g) finely ground graham crackers (about 30 squares)
1/2 teaspoon ground cinnamon
1 stick (100 g) unsalted butter, melted

Filling:
1 pound (450 g) cream cheese, softened
3 eggs
1 cup (180 g) sugar
1 pint (450g) sour cream (I usually put 4 heaped tablespoons)
1 lemon, zested
1 dash vanilla extract
100g of chocolate buttons or any chocolate that can be used for melting
The How To:

For the Crust
  • Preheat the oven to 180°C. 
  • In a mixing bowl, combine the ingredients for the crust with a fork until they are evenly moistened.  
  • Lightly coat the bottom and sides of an 8-inch spring-form pan with non-stick cooking spray. 
  • Pour the crumbs into the pan and, using the bottom of a measuring cup or the smooth bottom of a glass, press the crumbs down into the base and 1-inch up the sides. Refrigerate for 5 minutes. 

For the Filling:
  • In a double boiler, melt the chocolate. Set aside to cool. 
  • In the bowl of an electric mixer, beat the cream cheese on low speed for 1 minute until smooth and free of any lumps. 
  • Add the eggs, 1 at a time, and continue to beat slowly until combined. 
  • Gradually add sugar and beat until creamy, for 1 to 2 minutes. 
  • Add sour cream, lemon zest, and vanilla. Periodically scrape down the sides of the bowl and the beaters. The batter should be well-mixed but not over beaten. 
  • Scoop out 3-4 tablespoons of the batter into the now cooled melted chocolate. Mix it together to get a chocolate batter. 
  • Pour the filling into the crust-lined pan. Spoon the chocolate batter on top of the filling; try to put a dollop of chocolate batter a bit further away from each other. 
  • With a spatula or blunt knife, swirl the chocolate batter into the creamy batter creating a swirl-y effect. Don't fuss over this bit, it's all going to taste great in the end! 
  • Bake for 45 minutes. The cheesecake should still jiggle (it will firm up after chilling), so be careful not to overcook. 
  • Let cool in pan for 30 minutes. Chill in the refrigerator, loosely covered, for at least 4 hours. Loosen the cheesecake from the sides of the pan by running a thin metal spatula around the inside rim. 
  • Unmold and transfer to a cake plate. 


Happy Baking!

Monday, October 31, 2011

Halloween Treats

Happy Halloween!


Earlier this month, I decided that I just had to throw my own Halloween party. Partly because I'm not allowed to go to any of the big Halloween parties that happen around Dubai and mostly because I've been looking for an excuse to drape my house in decorations.

The über delicious graveyard cake
It was held last weekend, and all my girlfriends were invited. A good number of the girls showed up and were impressed with how much work my family and I put into the set up. My mom had bought around 50 yards combined of orange and black fabric, lots of Halloween ornaments, and one of her good friends who works at an event management company had lent us a tall witch carved out of Styrofoam and a bunch of Styrofoam pumpkins. It was lots of fun to watch everything come together. Lots of candles and lights set the mood and I was ready to party.


What's a Halloween party without the treats, though, right? My lovely friend Qadria arrived to my place early with a pre-baked and frosted dense chocolate cake (which was amaaaaaazingly delicious) that we later decorated to look like a graveyard. She also brought dense chocolate cupcakes frosted with chocolate ganache and topped with meringue ghosts. Super cool! I baked vanilla cupcakes the night before which we later stuffed with a wonderful toffee sauce, topped with a chocolate frosting and then sprinkled crushed caramel Oreos to give the illusion of dirt. Then we put gummy worms on them. Can you say 'heart attack'? We also made brain cupcakes (vanilla cupcakes with pink vanilla frosting) and cake balls that we decorated to look like eyeballs. Decorating with Qadria was so much fun and quite the success.

Braaaaaaainzzz


The girls showed up one by one and I was highly impressed with their costumes. Won't be able to share those photos but we had costumes like The Black Swan, main character Alex from A Clockwork Orange, a pilgrim who made her costume from napkins and a pillowcase (!!!), and a full blown lion from The Wizard of Oz. Overall, my house was infested with some genius women who had really cool costumes. I think my party was the best costume party of all ;)


'Vampire's Delight' punch

All photos are taken by the lovely Devina Divecha. Visit her food blog, she's very talented and one of my favorite bloggers!


Happy Baking!

Monday, September 26, 2011

Mini Chocolate Cupcakes With Blue Vanilla Frosting


I'm a sucker for miniature food, especially desserts. No matter how simple they are, they always impress me. They also take way more time to make than when they are made in their normal size but it's always worth it in the end. 

I usually shamelessly attack the miniature desserts at buffets right after I'm done eating my main course. I then go on to tell myself, in vain, that they're so small, how could they possibly be bad for you?


Here's a simple way to add the element of 'cute' to any gathering or occasion: Mini Cupcakes! I added blue food coloring to my frosting and tried them in two different tints. I plan to experiment some more with different colors and different flavors.


For the chocolate cupcakes: (This makes around 200 mini cupcakes)

3 cups all-purpose flour
1 1/2 teaspoons baking powder
1 1/2 teaspoons baking soda
1/4 teaspoon salt
12 tablespoons unsalted butter, softened
2 cups firmly packed light brown sugar
3 large eggs, separated, at room temperature
9 ounces unsweetened chocolate, melted
2 cups milk
1 1/2 teaspoons vanilla extract
  • Preheat oven to 350 degrees F. Line your mini cupcake/muffin tin with mini paper cups.
  • In a small bowl, sift together the flour, baking powder, baking soda, and salt. Set aside.
  • In a large bowl, on the medium speed of an electric mixer, cream the butter until smooth. Add the sugar and beat until fluffy, about 3 minutes. 
  • In a separate small bowl, beat the egg yolks until thick and lemon-colored, about 2 minutes. Add the beaten yolks to the butter mixture and beat well. Add the chocolate, mixing until well incorporated. Add the dry ingredients in three parts, alternating with the milk and vanilla. With each addition, beat until the ingredients are incorporated, but do not overbeat. Using a rubber spatula, scrape down the batter in the bowl, making sure the ingredients are well blended and the batter is smooth. 
  • In a separate small bowl, beat the egg whites on the high speed of an electric mixer until soft peaks form. Gently fold into the batter. Scoop the batter in the mini cups.
  • Bake for 10-12 minutes, or until a cake tester inserted in the center of the cake comes out clean. Let the layers cool in the pans for 1 hour. Remove from the pans and cool completely on a wire rack. 

For the frosting: Scroll down and check out Sweetapolita's easy recipe for Sugary Birthday Buttercream Frosting!


Happy Baking!

Tuesday, August 9, 2011

Red Panda's Favorites From Turkey

Oh, hi there!

So yes, it has been almost 2 weeks since I've come back from Turkey and I've sorta been, well, too quiet. The truth is I've gone into withdrawal. No, no, I'm not on any sort of drugs.. Unless you consider Istanbul one. Let's just say I've experienced two weeks of what was one of the most beautiful countries I've visited yet. My family and I had spent a week in Antalya, taking in the history and culture of the city and another week in Istanbul, taking in the charm of it all. It was so hard to come back. I found myself asking my parents to just leave me in Istanbul, "I'll be an illegal immigrant and sell roses for a living!" I'd say. Yeah. Not healthy.

Out of the two cities that we had the chance to visit, I fell madly in love with Istanbul. I don't know what happened, but I started wishing for the city to turn into a man that I could marry. Crazy stuff. Let me just say it once and for all, you have to visit Istanbul. It's a city that has something for everyone. Love to sight-see? Love music? Love the hustle and bustle? Love people watching? Love to take photos? Love food? Istanbul has it all and more. I felt so alive over there, it was a city that just never slept. I truly cannot wait for the next opportunity to visit that enchanting city again.

Well now that I'm somehow recovered, I decided a post about my top favorite desserts in Turkey should go up. As expected, I spent most of my time eating in Turkey. It's hard not to, really. I'm sure I gained 7 kilos but didn't dare confirm that on the scales. Instead I consoled myself by thinking *Oh, don't worry. You did not gain weight, but happiness* I love telling myself white lies.

Okay, on to the sweets!

1. Chocolate pudding topped with grated pistachios


You'd think that in Turkey, people wouldn't bother with chocolate seeing as they pour sugar syrup on everything. I mean, especially with baklava available at every corner. Think again. Every pastry shop we entered, be it in Antalya or Istanbul, we would see at least 3 Turkish people eating a bowlful of this chocolate pudding. Some would even ask for a dollop of dondurma (Turkish ice cream). If you're a chocolate freak like I am, this is for you. I can't recall what they called it in Turkish but you can't miss it!

2. Dondurma (Turkish ice cream)


Summer's never complete without ice cream and I had lots of it in Turkey. Dondurma is just like Arabic ice cream (Booza) It has a distinctive, fresh taste. I especially enjoyed the fruit flavored ones but my favorite by far was the caramel dondurma. A must try! You'll find a dondurma stand at almost every corner, especially in Istanbul.


3. Kunafa


Kunafa, or knafeh as we call it at home, has always been a childhood favorite. It's hard not to fall in love with this dessert if you're a sweet tooth. Shredded kunafa dough on the bottom layer, a thick sweet layer of ooey gooey cheese, another thicker layer of kunafa dough which is baked to perfection and then topped with grated pistachio. And then, just to take it to the next level, it is swimming in luscious sugar syrup that has been poured on after the baking process is done. Hands down, the kunafa in Turkey is the best I've EVER tried (and I've tasted many a kunafa in my day in Syria and Lebanon) Seriously, the Turks know exactly what they're doing!

4. Baklava


Of course, no trip to Turkey is complete without the world famous Baklava. Walnut and pistachio fillings, mmmmmmm. Crispy philo pastry that's light and fluffy like a pillow, mmmmmmm.
The first time I ordered a few pieces of baklava, I was hoping and praying that this wouldn't be another one of those overrated desserts which would disappoint me. But this really did it for me (and my parents, who were raving about it since their last visit to Istanbul). Best. Baklava. Ever. Like I said, the Turks really know what they're doing. I'm never going to have Baklava anywhere else again. Ever.
Oh and we also came back with a whole box of these and they stayed crispy for 3 days!

5. Bal (Honey)


Who would have thought that I'd fall in love with honey all over again? Turkey, you've done it again. We went down to this little family-owned restaurant near the Blue Mosque in Istanbul and decided to have some breakfast there. That's when I first noticed a giant slab of honeycomb in a pool of sparkly honey and I was just mesmerized by it. My mom noticed me in my frenzy and directly ordered me a plate. They served it with toasted walnuts and a dollop of fresh cream (which was absolutely divine). The perfect breakfast. I can still taste it!
Oh and if you're interested, this restaurant was called Elif Cafe. A must try, they serve a wonderful breakfast plate too.


Hope you're all safe and for whoever is fasting, I wish you a wonderful month. 

Ramadan Kareem & Happy Baking!