Showing posts with label home-made. Show all posts

Monday, August 13, 2012

Mini Vanilla & Chocolate Tarts


I've realized not too long ago that I'm pretty much obsessed with all desserts that are made in individual servings. And I simply love anything that's a miniature version of its original form. I convince myself that I'm not consuming as many calories when I have a mini cupcake, a mini apple pie, or brownies cut into tiny pieces it would be criminal to have just one. Everything's cuter when it's mini anyway. Like kittens, puppies and humans; I wouldn't advise those to be consumed though...


This brings me to a treat I like to make which is not necessarily tiny but is meant for single servings: tarts! I first started making these tarts in 2009 when I decided I wanted to try making tart crust/dough from scracth, on my own. Since then, I've learned to follow instructions better and I am now able to make crust which is light and flaky. A personal achievement! Really, anyone can make tart crust/dough, it just needs a little bit of patience and some gentle + cold hands (or a food processor if you don't like to make it by hand).


I would say that this is a fairly easy recipe to follow but is time-consuming especially if you are a beginner at making pastries. However, the results always turn out great - even if your tart crust doesn't turn out as flaky as you'd like, it will still always taste good. Practice makes perfect and I myself am still practicing to perfect this technique. After all, we're just baking to put a smile on someone's face and satisfy that sweet tooth! These tarts are great for parties or gatherings; I've baked them for a picnic and several gatherings in the past and they've always been quite a hit. I made these particular ones for my friend Wajiha who kindly invited me to her place for iftar where her mom cooked up a [delicious] storm.


I had a lot of fun decorating the chocolate tarts. Melted some chocolate and piped out flower shapes then topped them off with edible glitter.


There are so many ways to decorate tarts. I've topped the vanilla ones with berries, kiwis, and pineapples, the possibilities are endless. For the chocolate tarts, if I need something quick to top them off with, I chop chocolate and sprinkle it on top or you could even use sprinkles of your own choice. Again, it's totally up to you and what you come up with! :)

Tarts adapted from Fatafeat Magazine's Houriyat Al Matbakh
makes 25-30 tarts

Tools you'll need:

Pastry cutter (optional)
2 or 3 cupcake/muffin tins (This varies with everyone, depending on how much dough you end up with and how thick/thin you roll it out)
Cupcake/muffin liners or papers
Rolling pin
Round cookie cutter, about 3 inches in diameter
Dry beans or dry lentils or pie weights. These will be used for blind baking.

For the crust:

200g all-purpose flour
a pinch of salt
1/4 teaspoon baking powder

125g unsalted butter, fridge cold
120g sugar
1 large egg
1 teaspoon vanilla extract

butter spray or softened butter
  • In a large bowl, sift the flour, baking powder and salt
  • Cut the butter into small cubes and throw them into the flour mix. Using a pastry cutter, begin cutting the cubes of butter into the flour. Alternatively, you can use your hands: rub the mix between your hands so as to combine the butter and the flour. Keep doing this until your mixture looks like damp sand; little crumbles of dough. Whatever you do, do not knead. This will help you achieve that lovely light, flaky crust in the end.
  • In another bowl, beat the sugar, eggs and vanilla until it turns from a dark yellow into a pale yellow color and is fluffy.
  • Add the egg mix into the flour mix and fold it in. Again, do not knead the dough. Simply combine the wet and dry ingredients together; you can use your hands or a spatula, whatever you prefer.
  • If your dough still feels sticky, add more flour as you go. Continue doing this until your dough can hold its own and is formed into a ball.
  • Take a piece of cling foil and wrap your dough in it. Leave it to rest for 30 minutes in the fridge.
Assembling + Blind Baking:
  • Prepare 2-3 cupcake/muffin tins; spray a little bit of butter spray in each cup or if you're using softened butter, brush a thin layer of butter into each cup. Set aside.
  • Preheat your oven to 180°C
  • Take out the dough from the fridge, unwrap from cling foil. To make it easier for you to use, cut the ball of dough in half.
  • On a clean, flat surface which is lightly floured, roll out your dough with your rolling pin. Thickness of the dough is totally up to you, I prefer a crust that has a bit of a bite to it so I roll it out about 1/4 inch thick.
  • Using your round cookie cutter, cut out rounds; try using up as much dough as possible.
  • Take your round pieces of dough and fit each one in a separate cup in your cupcake/muffin tin. Use your fingers to push them into place and shape them as you wish. Don't worry if you mistakenly pierce little holes, just take a little piece of left-over dough and patch them up. Repeat this process till all your dough is done.
  • On top of the dough, place the cupcake/muffin papers or liners. Lightly push them into the dough. Now pour in your dry beans/lentils/pie weights and fill the papers about 2/3 to ensure they weigh down the dough.
  • Bake in the oven for 15 minutes or until you can see the edges of your dough turn a nice golden color.
  • Take out the cupcake/muffin tins from the oven. Carry out the cupcake/muffin papers or liners filled with the dry beans/lentils/pie weights. I don't throw away my dry beans as I can use them again for the next time I bake a pie or tart.
  • Switch off your oven's bottom burner and light up the top burner. Put the cupcake/muffin tins back in the oven and bake for just 5 minutes. Be careful not to burn your tart shells, this is just to lightly bake the tops which weren't previously exposed to heat.
  • Remove your baked tart shells from their tins and allow them to cool on a rack while you make the filling.
For the filling:

700ml milk, at room temperature
120 g sugar
2 eggs, at room temperature
1 teaspoon vanilla extract
60g corn flour
100g dark chocolate, broken into small pieces or chocolate chips*
  • In a large saucepan on medium heat, heat the milk till it simmers. Set aside for a bit.
  • In a bowl, beat the eggs with the sugar and vanilla until it is a pale yellow and becomes fluffy. Then add the corn flour and slowly beat that into the egg mix.
  • Spoon in about 3 spoonfuls of the heated milk into the egg mix and mix together.
  • Now add the egg mix to the rest of the milk in the sauce pan and return to medium heat.
  • Constantly stir the mix, do not leave it unattended as it can curdle.
  • Keep doing this until your filling reaches a thick consistency; it should have an egg custard-like texture.
  • Remove from heat and transfer to a bowl to cool down. *[For chocolate tarts, I separate half the ready filling into another bowl and while it is still hot, I add the chopped chocolate which melts with ease. And viola, you have chocolate filling!] 
  • Once it is at room temperature, you can either spoon the filling into your tart shells or put it in a pastry bag and pipe it with a star tip.
  • Top off vanilla tarts with fruits of your choice and the chocolate tarts with sprinkles or little pieces of chocolate, or whatever you prefer. Place them in an air-tight container and pop in the fridge to cool.
  • Enjoy!

Happy Baking!

Sunday, July 29, 2012

Muhallabiya | مهلبية

Is there anything better than a dessert that calls for just 4 ingredients? I think the simpler any recipe is, the better. I've never been a fan of over-complicated recipes which call for ingredients that you've never heard of that come from some point on Earth. The best desserts are the ones that focus on 2-3 ingredients and have maximum flavor!


I grew up eating desserts that weren't fussy like Muhallabiya and rice pudding - in Arabic: Riz b haleeb | رز بحليب - and always loved the pudding-like texture. In fact, it's the reason why my favorite dessert is chocolate pudding! But anyway, I wanted to sort of recreate a small part of my childhood by trying to make Muhallabiya on my own. So you can imagine the joy I felt when my mother told me what Muhallabiya consists of: milk, sugar, corn flour and whatever topping you desire which, in this case, was pistachios for me. Just a few steps and you get a lovely milk pudding which isn't too sweet nor is it too heavy.
Thanks to bad lighting during iftar time (sunset), photo quality wasn't so great. Sorry!
I can only imagine the different combinations that people come up with to add into this dessert or to top it off with; the variations are endless!


Muhallabiya - My mother's recipe
makes 4 large bowls

1 liter full fat milk, cold
3 tablespoons corn flour*
1/2 cup sugar (100 g) - you can add more or less sugar, it's a matter of personal taste
A generous handful of peeled, unsalted pistachio; chopped

  • In a separate glass, mix in 1/2 cup of milk with the 3 tablespoons of corn flour. Set aside.
  • In a large pot on medium heat, pour the rest of the milk in and whisk in the sugar.
  • When the milk starts to heat up, add the corn flour & milk mix into the pot. Continue whisking.
  • Once the mixture starts coming to a boil, the consistency of the milk should start to get thicker.
    * If you feel that it hasn't thickened even after it's been boiling for about a minute, go ahead and mix in another tablespoon of corn flour in 1/4 cup of milk and plop that right in. Repeat again if the same happens, but that is unlikely :)
  • Continue whisking until you reach a pudding-like texture (it should coat the back of a spoon quite well). Be careful not to boil too much as it can curdle!
  • Remove the pot from the heat and, using a fine sieve, filter the Muhallabiya into a large bowl. This is to leave out any bits of burnt milk from the bottom of the pot (which is inevitable).
  • Scoop the Muhallabiya into desired serving bowls. Cover with a sheet of cling wrap, allowing the cling wrap to touch the surface of the Muhallabiya, so as not to create a skin.
  • Refrigerate for 4 hours (or until it's cold enough to your liking).
  • When ready to serve, peel off cling wrap and decorate with pistachios
  • Enjoy!

Ramadan Mubarak & Happy Baking!

Tuesday, July 10, 2012

Churros with Chocolate Dipping Sauce

Ever get those days when you're too lazy to roll out of bed? And so you just stay in there for the next hour either reading a book or contemplating the meaning of life and your purpose in it? And then suddenly you get that sweet tooth calling out to you, pleading that you satisfy it with a nectarous breakfast? Yeah, I get those mornings more often than I'd like to admit. Sometimes I feel a tad more creative and flip through my cook books to find something different, but easy, to make.

This is where the churros come in...


The first time I ever tried churros was when I had my first Taste of Dubai experience. I fell in love with what I'd like to call a Spanish doughnut; they had a crispy shell and were so light and airy inside. Little did I know, they are really simple to make! Apart from the chocolate dipping sauce that comes along with this recipe, the churros themselves have 7 ingredients that you need. And the best part is that all these ingredients can be found in any kitchen where lots of cooking is being done. Yay for convenience! And another yay for laziness!

The sound of the light crackling & popping of the oil when deep frying the churros is like music to my ears. (I promise I don't deep fry as much as the previous statement makes me sound like I do..) It reminds me so much of my childhood: when my mom used to make chicken nuggets and french fries for me and my brother on a lazy day in. Deep-frying seems to be synonymous with being a couch potato, huh? Ah well, everyone deserves a break from time to time. But yes, the churros. Once they touch the hot oil, they almost immediately poof up into little pillows and float on the surface. Just be careful not to burn yourself with oil popping everywhere and you're set.


The perfect lazy sweet snack for the ultimate lazy day in.

P.S. Am I a glutton for thinking these would be absolutely delicious with dulce de leche? WOW! Need to make some more to try that out.


Churros with Chocolate Dipping Sauce adapted from Nigella Lawson's Kitchen

For the churros:

50g caster sugar
2 teaspoons ground cinnamon
125g plain flour
1 teaspoon baking powder
1x15ml tablespoon olive oil
250ml freshly boiled water
approx. 500ml corn or vegetable oil, for deep frying

- Mix the sugar and cinnamon in a wide, shallow dish: this is for shaking the cooked churros in to coat them later.
- Sift the flour and baking powder into a bowl then beat in the olive oil and the boiled water.
- Keep mixing until you have a warm, sticky dough.
- Leave it to rest for about 10 minutes.
- Heat up the oil in a small saucepan, the oil should come up about a third of the way up the sides of the pan. It should be about 170°C. 
- Load up a piping bag with a large star-shaped tip and fill it with the churros dough.
- Squeeze short lengths (4-5cm) of dough into the hot oil, snipping them off with a pair of scissors as you go.
- Cook about 4-5 at a time and, once they turn a rich golden brown, fish them out of the oil with a slotted spoon or spatula or with tongs onto a baking sheet lined with some kitchen roll.
- To keep the cooked churros warm while you fry the remaining dough, transfer them to a parchment-lined baking sheet and hold in a low heat oven.
- Once you're done cooking all the churros, allow them to rest for a few minutes.
- While they're still warm, toss them in the sugar and cinnamon mixture and shake them about till they all get a good covering.

For the chocolate dipping sauce:

100g good-quality dark chocolate
25g chocolate milk
1x15ml tablespoon golden syrup
150ml double cream

- Melt all the ingredients in a heavy-based saucepan over low heat.Once the chocolate starts to melt, stir everything together and take it off the heat.
- Leave it in a warm place.
- Serve in individual pots/bowls.
- Enjoy!

Happy Baking!

Wednesday, June 6, 2012

BBQ Cake

So, guess what? I'm graduating... TOMORROW! *breaks into a dance* I can't find the words to describe my excitement. Albeit I will still be doing my last couple electives so I'll officially be a graduate by mid July (إنشاء الله) But still, VERY EXCITED! :D Bought myself a new dress and a pair of shoes to wear on the occasion. I think I earned it after 4 years full of hard work, craziness, emotional roller coasters, life lessons, friendships, tough decisions, growing mentally (and physically ;) ), and wonderful memories. Here's to many more years full of character!

On to the cake! As you may have read in my previous post about Majed helping me out so much in my cake-making adventures, I decided I had to return the favor to him in some way. And what better way than to do it through cake? Majed's known as the BBQ Man in our circle. It was inevitable to make him a BBQ cake; it just simply had to be done. (I was actually planning to make this since late January and it was all hush hush since then).


All toppers are made with molded/shaped cake & covered with fondant
It was a three-day affair, with the first day dedicated to baking the cakes and getting all the fillings and butter cream frosting ready. The second day I packed all my tools, cakes, frostings and the odd rolling pin over to Hana's place to get decorating. Hana was enjoying hand-crafting the cake toppers while I got down to icing the base of the cake and trying to smooth it out as much as my spatula allowed me to. After 7 hours of hard labor (read: serious cake decorating), we were pleased with our result. Now it was all down to getting it to Majed's place the next day to surprise him with it.

Majed's hearty steak


The surprise was successful! Majed had no clue. He was wildly confused; it was amusing to watch him walk around his living room and greet all of us with a big question mark on his face. Quote of the day from Majed: Holy sh*t! This is the best cake EVER! *Yasmin and Hana put success faces on and tip their hats* Our work here is done.


"burning coal" made from tinted marshmallows
Enjoying his [sweet] steak
This cake goes right to the top of my list. Not trying to blow my own horn but I am very proud of this cake because it brought so much joy to everyone who saw it and ate it!

Filling: center + top is chocolate ganache & the rest is chocolate butter cream with crushed Maltesers

Death by cake, it happens.


Once again, Happy Birthday Majed. Hope you enjoyed it x


Happy Baking!

Thursday, March 8, 2012

Lemon Loaf Cake

I'm writing this post as I lie down on my bed, covered in a big blanket, with a tissue box to my left and my cat cuddled up next to me on my right. I'm still recovering from a flu which doesn't seem like it's going away anytime soon. But with a little bit of Jack Johnson, a dam to my river of worries about my midterms (nerd alert) and some happy blogging vibes, a flu won't be the end of me.


I've been baking this cake quite a lot in the past 2 months, it has now become another family favorite. Frankly, this list keeps growing so I'm no longer keeping count. I must say that this sometimes works against my favor on busy days when I have no time nor energy to bake. But my mom pulls out the puppy-dog eyes and I'm sold; running to the kitchen to start mixing and baking.

Lemon zest, anyone?
This cake's very simple to make (as most of what I love to bake is) and is one of those cakes you can keep in an air-tight container all week long without it getting spoiled. I love having a slice of this for breakfast with some green tea: HEAVEN! Seriously, who has cereal in the morning when you have a beautiful cake waiting for you to indulge in?


A ray of sunshine


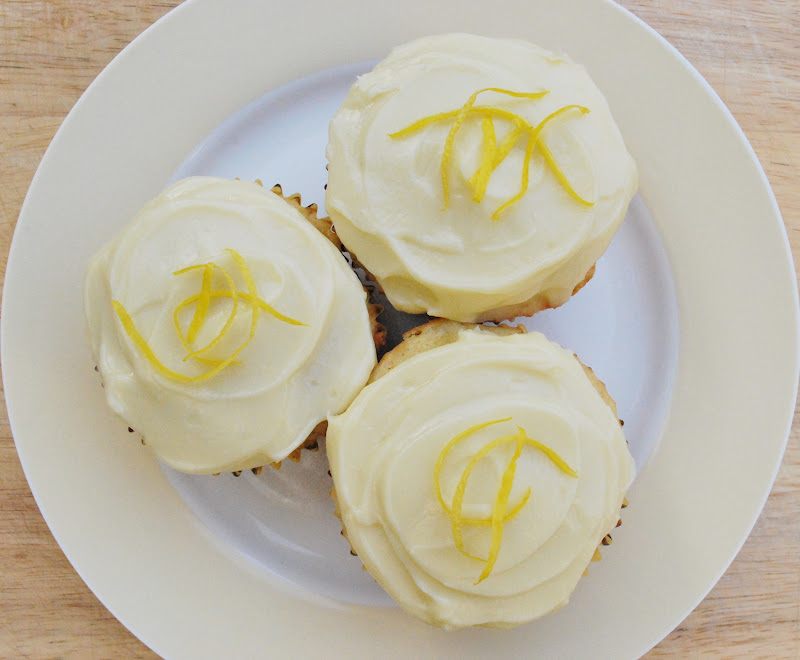
If you've got extra cake batter left then I suggest you have some fun with it by making some cupcakes. Top them off with ever-so-light cream cheese frosting and a touch of lemon zest.

Looks like a party, doesn't it?


Lemon Loaf Cake adapted from The Complete Magnolia Bakery Cookbook

For the cake:
2 sticks of butter (approx. 200g), softened
2 cups sugar
4 large eggs, at room temperature
1½ cups self-rising flour
1¼ cups all-purpose flour
1 cup milk
1 teaspoon vanilla extract
1 teaspoon of lemon essence/flavoring
zest of 2 lemons
  • Preheat oven to 180°C (350°F)
  • Grease and lightly flour a large loaf pan; line the bottom with parchment paper.
  • In a large bowl, on the medium speed of an electric mixer, cream the butter until smooth.
  • Add the sugar gradually and beat for 3 minutes until fluffy.
  • Add the eggs one at a time, beating well after each addition.
  • Combine the flours and add in four parts, alternating with the milk and the vanilla extract, beating well after each addition. (Note: you can simply mix in the vanilla extract with the milk to make the alternation easier)
  • Add the lemon essence/flavoring and the lemon zest and mix until well incorporated.
  • Pour the batter into the loaf pan.
  • Bake for 45 minutes or until a cake tester inserted into the center of the cake comes out clean.
  • Let the cake cool in the pan for ten minutes.
  • Remove from pan and cool completely on wire rack.
  • Slice a nice big piece. Enjoy!
For the cream cheese frosting, I've used my favorite: Sweetapolita's Fluffy Cream Cheese Icing recipe

Happy Baking!

Monday, September 26, 2011

Mini Chocolate Cupcakes With Blue Vanilla Frosting


I'm a sucker for miniature food, especially desserts. No matter how simple they are, they always impress me. They also take way more time to make than when they are made in their normal size but it's always worth it in the end. 

I usually shamelessly attack the miniature desserts at buffets right after I'm done eating my main course. I then go on to tell myself, in vain, that they're so small, how could they possibly be bad for you?


Here's a simple way to add the element of 'cute' to any gathering or occasion: Mini Cupcakes! I added blue food coloring to my frosting and tried them in two different tints. I plan to experiment some more with different colors and different flavors.


For the chocolate cupcakes: (This makes around 200 mini cupcakes)

3 cups all-purpose flour
1 1/2 teaspoons baking powder
1 1/2 teaspoons baking soda
1/4 teaspoon salt
12 tablespoons unsalted butter, softened
2 cups firmly packed light brown sugar
3 large eggs, separated, at room temperature
9 ounces unsweetened chocolate, melted
2 cups milk
1 1/2 teaspoons vanilla extract
  • Preheat oven to 350 degrees F. Line your mini cupcake/muffin tin with mini paper cups.
  • In a small bowl, sift together the flour, baking powder, baking soda, and salt. Set aside.
  • In a large bowl, on the medium speed of an electric mixer, cream the butter until smooth. Add the sugar and beat until fluffy, about 3 minutes. 
  • In a separate small bowl, beat the egg yolks until thick and lemon-colored, about 2 minutes. Add the beaten yolks to the butter mixture and beat well. Add the chocolate, mixing until well incorporated. Add the dry ingredients in three parts, alternating with the milk and vanilla. With each addition, beat until the ingredients are incorporated, but do not overbeat. Using a rubber spatula, scrape down the batter in the bowl, making sure the ingredients are well blended and the batter is smooth. 
  • In a separate small bowl, beat the egg whites on the high speed of an electric mixer until soft peaks form. Gently fold into the batter. Scoop the batter in the mini cups.
  • Bake for 10-12 minutes, or until a cake tester inserted in the center of the cake comes out clean. Let the layers cool in the pans for 1 hour. Remove from the pans and cool completely on a wire rack. 

For the frosting: Scroll down and check out Sweetapolita's easy recipe for Sugary Birthday Buttercream Frosting!


Happy Baking!

Tuesday, September 20, 2011

Mini Apple Pies


I've officially started university this week and I am now in my senior year. Feels a little crazy how the time's just flown right by me. I still remember my first day at university; I was nervous and lost for the most bit. I had missed the Open House a few days earlier which meant I didn't get a tour of the campus. So I decided to check it out for myself and wander. I found myself in classrooms that weren't mine, walking into professors' offices mistaking them for the library (don't ask), and forgetting my locker code combination with all my belongings locked inside. Yeah, not a very good thing when you're already 5 minutes late to your class and need to take another 20 minutes to go get help and finally figure it out. The professor of that class wasn't very pleased with my tardiness.


Thankfully, I met a lot of great people along the way. I made some friends, professors came to know that I wasn't a slacker after all, and I participated in a lot of the activities in university. And soon after, I started working with the Students Services department which I did for the next 2 years. I learned a lot and appreciated every bit of the experience that I gained from my job. It was a lot of work, sometimes I'd find myself staying late till 11:00pm just to get things done! But I loved it.


On my third year I decided I just wanted to be a student. I wanted to play more of my favorite sport, badminton. I had more time to spend with my family and friends and I focused a lot more on my studies. Sometimes I would find myself with nothing to do and think to myself, "So.. This is what it feels like.." Ha!


So, here I am, welcoming my final year of university. It still feels surreal. I'm not sure what to expect but I'm ready for whatever's in store!


I've been daydreaming about mini apple pies for the past two weeks ever since I watched a cooking show on Fatafeat where a chef made them. I was so intrigued and thought that this would be perfect to make for my mom who has been constantly asking me to make her apple pie. Don't get me wrong, I really wanted to make one for her but I've been messing them up so much in the past 2 months that I've been ashamed to try them out again (or share any of my disasters with you). But after being inspired to make them in mini form, I thought maybe I could tackle this!

Only thing that's missing is a big scoop of vanilla ice cream

This a wonderful recipe for mini apple pies that I found on Zoom Yummy, a very helpful blog that you should check out. The pies come out nice and crispy with a soft, juicy filling. I warn you, though, they are very addictive. The first time I made these, I had 15 of them sitting in the kitchen in the morning and then came back home to find just 2 left in the evening!

Mini Apple Pies adapted from Zoom Yummy

For the crust:
2½ cups (350 gr) all-purpose flour
1 teaspoon salt
2 tablespoons (30 gr) sugar
1 cup (226 gr) unsalted butter, cut into pieces
½ - ¼ cup (60-120ml) ice water

  • Place the flour, sugar and salt in the bowl of your electric mixer. Stir with a spoon until combined (don’t use the mixer yet) 
  • Add the butter and mix (with hook attachment) until the mixture resembles coarse meal. 
  • Pour 1/4 cup (60 ml) water in a slow, steady stream until the dough holds together when pinched. If necessary, pour more water. Mix for only about 30 seconds 
  • Remove the dough from the mixer bowl, cover with plastic wrap and refrigerate for about one hour before using. 
For the filling:

5 medium apples; peeled, cored and diced
½ cup (100 gr) brown sugar
1 tablespoon lemon juice
1 teaspoon ground cinnamon
¼ teaspoon salt
1 tablespoon + 1 teaspoon (15 gr) cornstarch

Softened butter/butter spray for greasing the pan
  • Peel the apples, core them and cut them into teeny tiny dices. Place the dices into a bowl.
  • Add the sugar, lemon juice, salt, cornstarch and cinnamon.
  • Mix altogether until all the diced apples are well dressed into the mixture.
  • Preheat the oven to 356 F (180 C).
Assembling:

  • Grease your regular sized muffin tin with softened butter/butter spray 
  • For the mini pies, you'll need the bottom crust and the top crust – the bottom circle 4 1/2 inch (11 cm) being slightly wider than the top one 3 1/2 inch (8.5 cm) 
  • Remove the dough from the fridge and place it on a lightly floured surface. Using a rolling pin, roll it out to about 0.1-inch (3 mm) thickness. Cut out circles (big & small) from the dough. Repeat this step until you run out of dough. 
  • Press the large circles gently into the muffin cup 
  • Fill the dough with the apple mixture so that it comes over the top of the pan. 
  • Take a small circle and put it on top of your pie. With your finger, press the edges down gently. Use a fork or your fingers to seal the top circle to the bottom circle. 
  • Using a sharp knife, make two slits in the centers of your cute pies to allow the steam to escape. 
  • Continue doing this process until you've run out of the dough and apple filling. 
  • Place in the oven and bake for about 25-30 minutes or until golden brown. 
  • Once they are done take them out of the oven and let them sit for about 15 or 20 minutes so they get cool enough to handle.

Happy Baking!

Saturday, September 3, 2011

Ma'amoul | معمول‎

I know I'm 4 days late but:

EID MUBARAK!

The holy month of Ramadan has (sadly) come to an end and Eid ul-Fitr is here. This Eid is celebrated for 3 days; Muslims all over the world prepare wonderful feasts for family and friends, adults give Eidiya to children (which is mostly money that's gifted to the kids) and everyone wears new clothes that they've bought especially for Eid. It's a joyous 3 days where everyone sends each other messages, makes phone calls and pays visits to congratulate one another on a wonderful month of fasting. 

Just wanted to note that the crochet table cloth was made by my super talented grandmother!

I personally wish I had relatives that lived in the same country as me so that I could visit them one by one and be able to celebrate with them. I would love to bake treats with my grandmother and distribute them to family and friends with my grandfather. Unfortunately, sometimes as an expat you don't get that kind of luxury. I'm thankful that I have my parents and brother to spend it with otherwise it wouldn't be Eid at all. Oh and let's not forget a wonderful network of friends!

Needless to say, Eid ul-Fitr is my favorite Eid. And on this Eid, every year, we make a special treat called Ma'amoul. We use my grandma's recipe which she's perfected over the years (Oh God, please make me a super baker like her one day!)

Ma'amoul is a shortbread cookie filled with either dates, pistachios or walnuts. They are known not to be overly sweet, so you can pop a whole lot of 'em at once! Some people decorate them by hand while others use special wooden molds to create wonderful designs on the cookie. Ma'amoul is very popular in Syria, Palestine, Jordan, Lebanon, Iraq and Turkey. You'll usually find it in abundance during any religious festivals (such as during Easter celebrated by Arab Christians).


Mom preparing the dough

Filling the pastry with walnuts and sugar

What I love about making Ma'amoul is that it brings people together; you rarely find one person in the household making it all by themselves. Well, at least that's like blasphemy in my house! This year, my parents and I made a huge batch together to give out to friends. 


Once the pastry is filled, you roll it up into a ball and push it into the wooden mold
To get the pastry out of the mold, the most effective way is to flip it over and THWACK it on any solid platform 
Date filling with an unintentional heart-looking design, anyone?

Date filling is by far my favorite. I can eat 10 of these in one go. I did not just say that out loud.


Freshly baked and ready to roll around in some powdered sugar


I hope that whomever celebrated Eid ul-Fitr had a wonderful one filled with family, friends, and lots of delicious treats!


Ma'amoul - معمول‎ 
my grandmother's recipe

What you'll need:

4 cups semolina
2 cups flour 
1 cup butter, softened
1 cup cooking/vegetable oil
1 tablespoon baking powder
1 teaspoon vanilla extract/essence
Water at room temperature, enough to add till the dough is formed.

  • Mix the dry ingredients until well incorporated
  • Add butter and oil and work in with your hands
  • While kneading the dough, add water at intervals until the dough forms. Once you're able to handle the dough and form a flat pancake-like shape, it's ready. (Refer to first series photo to know what I mean about this)


Happy Baking!